Modifying Your WordPress Look with the Customizer
- -->> 6. Modifying Your WordPress Look with the Customizer
What you'll learn
 WordPress Customizer OverviewGlobal Visual AdjustmentsHeader Element ConfigurationDesign Consistency Best Practices
The WordPress Customizer is a powerful and intuitive tool built directly into your WordPress dashboard, designed to give you real-time control over your website's appearance. It provides a user-friendly interface to make basic, site-wide visual adjustments without needing to delve into complex code or CSS. From fine-tuning your brand colors to selecting the perfect fonts and configuring crucial header elements, the Customizer streamlines the process of personalizing your site. This article will guide you through effectively leveraging this essential feature to craft a visually appealing and cohesive online presence, ensuring your website reflects your brand identity with ease and precision across all pages and posts.
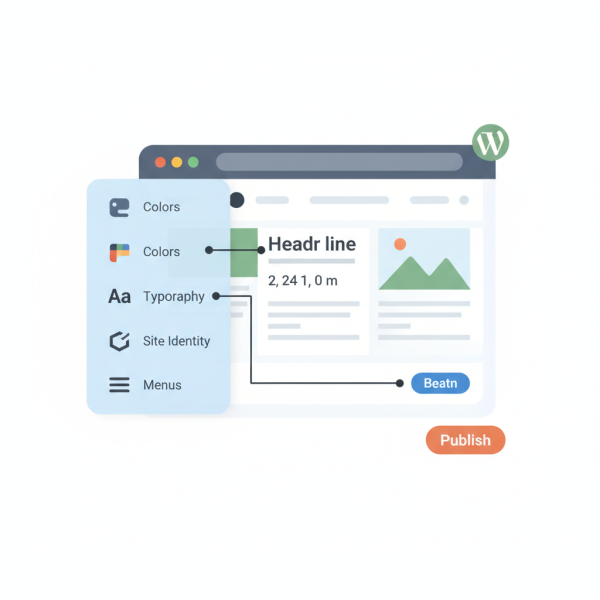
Understanding the WordPress Customizer Interface
Accessing the WordPress Customizer is straightforward. From your WordPress admin dashboard, simply navigate to Appearance > Customize. Clicking this option will open the Customizer interface, which presents a live preview of your website on the right side of the screen and a sidebar panel on the left containing various customization options.
The left-hand sidebar is organized into several sections, the specific options of which can vary depending on your active WordPress theme. However, you'll typically find core sections such as:
- Site Identity: For your logo, site title, tagline, and site icon.
- Colors: To control primary, secondary, accent, and background colors.
- Typography: For font family, size, weight, and line height settings.
- Header/Footer: Options related to the top and bottom sections of your site.
- Menus: To manage your site's navigation menus.
- Widgets: To configure widgets in various widget areas.
- Homepage Settings: To set your static front page or latest posts page.
- Additional CSS: For adding custom CSS rules if needed.
The real-time preview is one of the Customizer's most valuable features. As you make changes in the sidebar, you'll instantly see them reflected on your site, allowing for immediate feedback and iterative design adjustments. This eliminates the need to save, refresh, and then review changes, significantly speeding up the design process.
Making Global Color Adjustments
Colors play a crucial role in establishing your brand's identity and overall aesthetic. The WordPress Customizer makes it easy to manage your site's color palette. Within the "Colors" or a similarly named section, you'll typically find options to adjust various color attributes:
- Primary and Secondary Colors: These often define the main hues used throughout your theme for elements like buttons, links, and highlights.
- Accent Colors: Used for smaller, attention-grabbing elements.
- Background Color: The overall background color of your website or specific sections. Many themes also allow for background images.
- Text Colors: To ensure readability, you can often set distinct colors for body text, headings, and links.
- Header and Footer Colors: Specific options to style the background and text colors of these distinct sections.
By experimenting with these settings and observing the live preview, you can achieve a harmonious and branded color scheme across your entire website. It's advisable to have a clear understanding of your brand's color palette before diving into these adjustments to maintain consistency.
Customizing Typography for Readability and Style
Typography is another cornerstone of effective web design, impacting both readability and the overall tone of your site. The Customizer provides extensive options to fine-tune your website's fonts, ensuring your content is both legible and visually appealing. Look for a "Typography" or "Fonts" section within the Customizer.
Key typography settings you can typically adjust include:
- Font Family: Select from a list of pre-installed fonts or integrate popular web fonts like Google Fonts, which many themes support directly.
- Font Sizes: Set distinct sizes for different elements, such as main body text, headings (H1 through H6), and paragraph text. This ensures a clear hierarchy of information.
- Line Height: Adjusting the space between lines of text enhances readability, preventing text from appearing too cramped or too sparse.
- Letter Spacing: Modifies the space between individual characters, which can subtly improve visual flow.
- Font Weight: Choose between regular, bold, or semi-bold options for various text elements to add emphasis.
Thoughtful typography choices can significantly enhance user experience, making your content easier to consume and more engaging. Always prioritize readability, especially for your main body text, and use styling like bolding or different font weights sparingly for emphasis.
Adjusting Header Elements for Brand Presence
The header is often the first thing visitors see, making it a critical area for brand recognition and navigation. The WordPress Customizer offers dedicated sections, usually under "Site Identity" and "Header," to manage these vital elements.
Within the "Site Identity" section, you can:
- Upload Your Logo: Replace the default site title with your brand's logo. The Customizer often provides tools to crop and resize your image.
- Set Site Title and Tagline: Even with a logo, it's good practice to set a site title for SEO purposes and a brief tagline that describes your site.
- Add a Site Icon (Favicon): This small icon appears in browser tabs, bookmarks, and mobile home screens, reinforcing your brand identity.
Beyond basic identity, many themes offer more extensive header customization options:
- Header Layout: Choose from different arrangements of your logo, navigation, and other elements.
- Header Background: Set a background color, gradient, or even an image for your header area.
- Navigation Menu Display: Control the appearance and location of your primary navigation menu within the header.
- Sticky Header: Enable or disable a header that remains visible as users scroll down the page.
A well-designed header not only looks professional but also enhances user navigation and reinforces your brand message effectively.
Saving Your Changes and Best Practices
Once you've made your desired adjustments within the Customizer, remember to save your work. At the top of the left-hand sidebar, you'll find a "Publish" button. Clicking this button applies all your changes to your live website. If you're not ready to go live, some themes offer options to "Save Draft" or "Schedule" changes, though "Publish" is the most common action for immediate deployment.
Here are some best practices when using the Customizer:
- Consistent Branding: Strive for a cohesive look across your entire site. Use a consistent color palette and font scheme that aligns with your brand guidelines.
- Test Responsiveness: The Customizer often includes device icons (desktop, tablet, mobile) at the bottom of the live preview. Use these to check how your changes look on different screen sizes, ensuring a good user experience across all devices.
- Start Small: Make a few changes at a time, publish, and then review them on your actual site before making more extensive modifications.
- Backup Your Site: Before making significant design changes, especially if you're experimenting, always back up your WordPress site. This provides a safety net if something goes wrong.
- Theme-Specific Options: Be aware that the available options are highly dependent on your active theme. Premium themes often offer more granular control than free or basic themes.
Summary
The WordPress Customizer is an indispensable tool for anyone looking to make immediate, site-wide visual adjustments to their website without requiring technical expertise. By navigating its intuitive interface, users can effortlessly manage global color schemes, refine typography for optimal readability and style, and configure essential header elements like logos and navigation. Its real-time preview feature simplifies the design process, allowing for instant feedback on changes. Remember to save your work by clicking "Publish" and to follow best practices such as ensuring consistent branding and testing responsiveness across various devices. Mastering the Customizer empowers you to maintain a professional, cohesive, and visually engaging online presence that truly represents your brand.
Comprehension questions
 How do you access the WordPress Customizer from your admin dashboard?What are three common visual elements that can be adjusted site-wide using the Customizer?Besides font family and size, what other typography settings can often be configured in the Customizer?Why is it important to save your changes after making adjustments in the WordPress Customizer?
Review Quiz
Next Lesson
Course Contents : WordPress Themes and Site Customization
- >> 6.
 Modifying Your WordPress Look with the Customizer